
Most people buy the lights first.
They pick a strand off the shelf at a hardware store in Mar Vista or Culver City, get home, string them between whatever is available, plug in, and then spend the next hour wondering why it looks wrong. Too bright in one corner. Saggy in the middle. Extension cord running along the baseboard where everyone can see it.
The lights were fine. The placement wasn't.
Good bistro lighting placement shifts the mood of a backyard the same way good furniture arrangement shifts the feel of a room. Same materials, completely different result depending on where things go. This guide covers the actual decisions: hanging height, spacing between strands, anchor point selection, power source location, and the drape patterns that work versus the ones that just look like a job site left unfinished.
Why Placement Matters More Than the Fixtures
Here's the thing: the price difference between a $30 bistro strand and a $90 one matters a lot less than most homeowners realize. Same globe shape. Same warm-white output. Same basic wire construction. Walk the lighting aisle at any big box store in West LA and you'll see fifty variations that are functionally identical.
What separates the patios that look intentional from the ones that look like an experiment is where the wire goes.
Hang bistro lights too high and the bulbs float above the space with no visual connection to what's happening underneath. Too low and guests are ducking by the time the appetizers arrive. Space them too far apart and the light pools inconsistently. String parallel rows without thinking about the coverage pattern and the whole thing reads like a parking structure at 9pm.
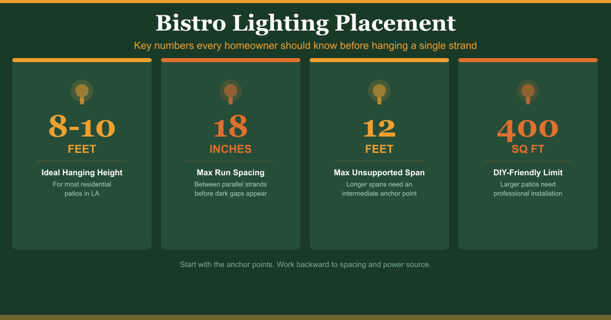
Eight to ten feet above the ground is the range for most residential patios in Los Angeles. That height keeps the light close enough to feel intimate without getting in anyone's way.
The Four Fundamentals of Bistro Light Placement
Hanging Height
Below eight feet and you're bumping into bulbs. Above ten and the warmth is gone before it reaches the table. That 8-to-10-foot window is not arbitrary. It's what actually creates an intimate lit environment versus a floodlit one.
Pergolas are the exception. If the beams sit at 10 feet, pull the strands taut across them rather than draping below. A drooping line underneath a clean beam structure loses everything the structure is trying to do visually. On an open patio with no overhead framing, a gentle catenary drape, that shallow U-curve between two anchor points, adds softness in a way a taut line never does. (It's also a lot more forgiving on uneven anchor heights, which is the real reason most installers prefer it.)
Spacing Between Lines
Twenty-four inches between parallel runs is about the maximum before the dark gaps between them start competing with the lit areas for visual attention. Eighteen inches is better for almost every residential application. Twelve is best for small, intimate spaces like a covered side patio in Palms or a courtyard in Mar Vista where you want even, warm coverage across the full surface.
Bulb spacing within the strand matters separately. Six-inch spacing reads festive, almost holiday-table dense. Twelve inches is the most common choice for patio dining areas and works for most setups. Eighteen-inch spacing has its place as an accent, but not as your primary light source over a table. The gaps show.
Anchor Points
This is where most DIY installations break down. Two posts on a small deck: fine. Anything larger than about 12 feet between anchor points and you need an intermediate support or the line sags into a deep bow by mid-span. That sag is the first thing guests notice.
Good options for Los Angeles backyards: existing wood pergola posts, exterior walls with eye hook screws, catenary poles set into ground sleeves, and mature trees with proper wrapping hardware. Bad options: fence posts under lateral tension, umbrella stands, anything decorative not built to hold wire load. (Homeowners in Culver City with older wood fences learn this around the first Santa Ana wind event.)
Catenary poles are the right call when there's no existing structure to work from. These are slim steel posts in weighted bases, installed at consistent heights. They're what most professional outdoor lighting crews use on bare concrete patios.
Power Source Location
Extension cords running across pavers are a trip hazard. They're also just an obvious sign that the installation was figured out last. For any setup you want to keep more than one season, power comes from a GFCI-protected outdoor outlet near one of the anchor points. Not stretched along a fence line. Not looped under a planter.
If the patio doesn't have an outlet in the right location, that's an electrician call before it's a lighting conversation at all. Running new outdoor circuits is part of what a professional outdoor lighting service handles upfront. They spec where the power connects at the same time as the strand layout, not after the wire's already in the ground.
Three Drape Patterns and When to Use Each
The Grid Pattern
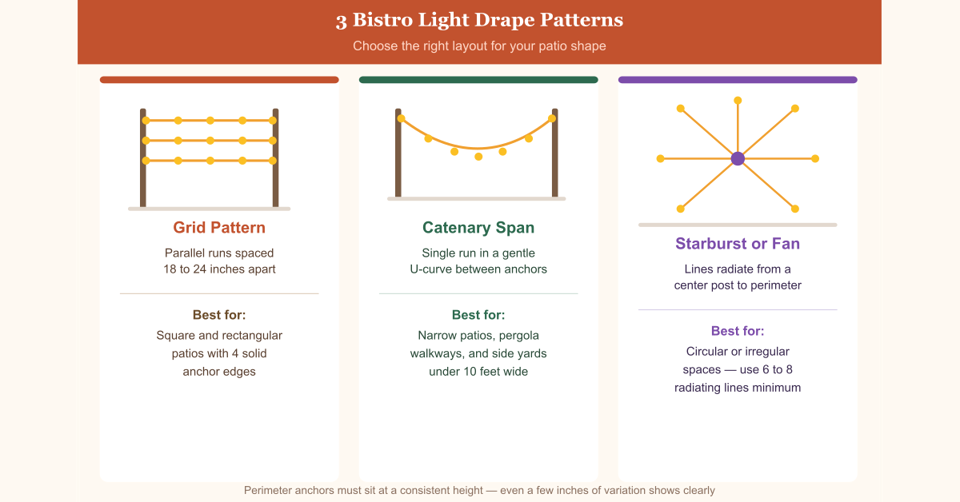
Square or rectangular patio, consistent anchor points on all four sides. Parallel runs in one direction, 18 to 24 inches apart. Most common professional pattern for a reason: covers evenly, looks intentional, reads clean from any angle. The catch is you need anchor points along two parallel edges at regular intervals. Anything inconsistent and the grid shows it.
The Catenary Span
One run, end to end, hanging in a shallow curve. Best for narrow patios, pergola walkways, and side yards where a full grid would be overkill. It shows up most often in restaurant courtyards and covered outdoor dining areas because it's the most formal-looking of the three. For residential spaces, two or three parallel catenary spans usually sit better than a single one.
The Starburst or Fan
Lines radiate outward from a center point to the perimeter. Works best in irregular or circular spaces where a grid feels forced. Six to eight radiating lines read as a deliberate pattern. Fewer than four and it starts to look like someone ran out of lights midway through. The perimeter anchors need to be at a consistent height or the whole thing looks uneven.
Common Bistro Lighting Placement Mistakes
Running the power cord along the fence line and hoping no one notices. They notice.
Mixing bulb shapes mid-strand because extra bulbs came from a different pack. Globe, Edison, LED tube, all on the same run. The mix reads as accidental, and no amount of correct spacing fixes it.
Skipping intermediate anchor hardware on spans over twelve feet. That center sag is the first thing guests comment on, not the warm light.
Anchoring to things that move. Umbrella stands, potted trees, portable heaters. None of them hold tension over time, and all of them eventually let the wire droop into the middle of the space.
And honestly, the biggest one: installing without any kind of timer or smart control. Bistro lights left on all night every night stop looking intentional within about two months. A smart outlet or a transformer with a built-in scheduler solves this before it becomes a problem.
For specifics on spacing standards, circuit requirements, and outdoor fixture load ratings, the Illuminating Engineering Society publishes residential outdoor lighting guidelines that apply to string light installs the same as any other exterior fixture type.
When to DIY and When to Call a Professional
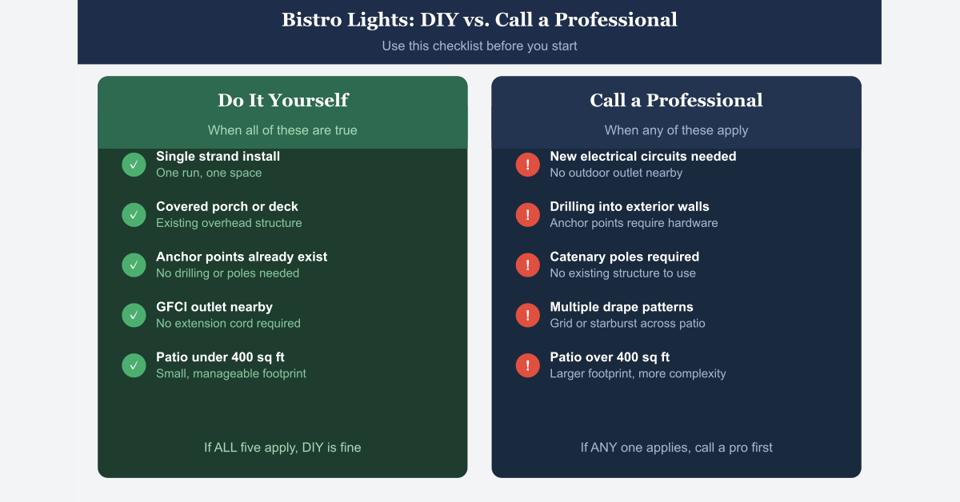
Single strand. Covered porch. Existing anchor points. GFCI outlet already nearby. Do it yourself.
Anything involving new circuits, anchor points drilled into exterior walls, catenary poles going into the ground, or a total patio area over 400 square feet: that's a professional job. Not because the work is complicated, but because the hardware and wiring decisions matter more on larger installations and the margin for improvising your way through it is smaller.
The cost math surprises most people. A professional installation on a mid-size Westside backyard costs more upfront, but the hardware is correct, the power is properly sourced, and the result doesn't need to be redone after the first season. That combination of factors usually makes the math work.
The Houzz outdoor lighting gallery is worth an hour before any professional conversation. It gives you a visual vocabulary for what you're responding to and a starting point for the anchor structure and pattern conversations. And Energy Star's outdoor lighting section covers LED bulb specs in plain language when you're comparing strand options.
Getting Bistro Lighting Placement Right the First Time
The difference between bistro lighting that looks intentional and bistro lighting that looks like an afterthought comes down to three things: hanging height, anchor quality, and where the power connects. Get those right and the rest of the decisions fall into place around them.
If the space has unusual geometry, no existing structure to anchor to, or needs new electrical work, a professional consultation saves a full reinstall later. The outdoor lighting placement guide covers positioning principles for every exterior fixture type, and it's worth reading before committing to anchor locations.
Start with the anchor points. Work backward to the strand layout. Then figure out the bulb spacing. That's the order the best bistro lighting placement decisions follow, every single time.
0 件のコメント
この投稿にコメントしよう!
この投稿にはまだコメントがありません。
ぜひあなたの声を聞かせてください。